The walking lunge is a heavily prescribed but often dreaded lower body exercise that makes you love to hate leg day. It has undeniable benefits, but it’s not without the quintessential burn that a solid lower body session is bound to bring. Whether you’re using higher weight or higher rep sets, the walking lunge is always a gut check — but with great discipline comes great reward.

Consistently used in your program, the walking lunge is a staple tool in your muscle-building box. Walking lunges tune up your mobility and help protect your unilateral balance. As a part of a strength routine, expect to make massive strides towards your goals. For everything you need to know about this leg day classic, here’s how to do the walking lunge.
- How to Do the Walking Lunge
- Walking Lunge Variations
- Walking Lunge Alternatives
- Walking Lunge Tips
- Who Should Do the Walking Lunge
- Walking Lunge Sets and Reps
- Benefits of the Walking Lunge
- Muscle Worked by the Walking Lunge
- Common Walking Lunge Mistakes
- Frequently Asked Questions
How to Do the Walking Lunge
The walking lunge is performed using just your body weight or any number of weighted implements. From dumbbells and kettlebells or even barbells for the courageous among us, the walking lunge is as simple (yet effective) as it sounds.
Step 1 — Set-Up
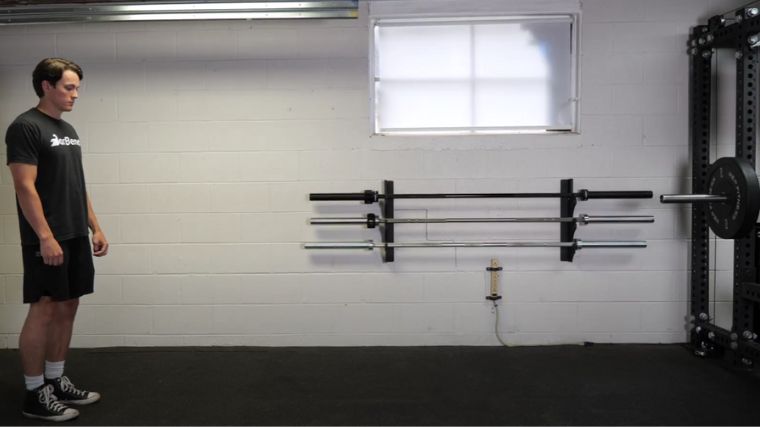
Find an open walking path that allows you to perform as much of your set as possible before needing to turn around. Stand tall with a hip-width stance and a stacked torso. Before you start, tense your body to prepare you to control each repetition. Tighten your glutes, quads, core, and arms to stabilize before you start.
Coach’s Tip: If you are using dumbbells, squeeze them as tightly as possible. Prevent your dumbbells from pulling you out of position by gripping tightly and locking your lats.
Step 2 — Step
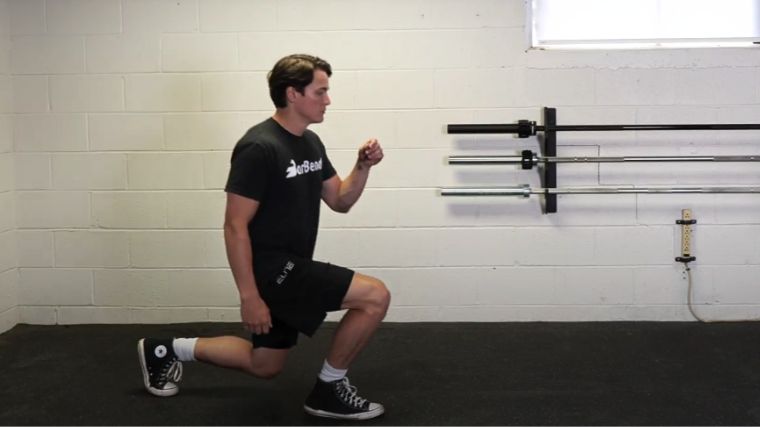
Begin your set of walking lunges by taking a medium to long stride forward. Step with one leg in a straight line, landing with full foot pressure and controlling your descent. Lower yourself on the working leg until your knee reaches approximately 90 degrees.
Coach’s Tip: A longer stride length challenges your stability a bit more. Find a nice middle ground that best suits your body and allows you to safely execute your set.
Step 3 — Stand
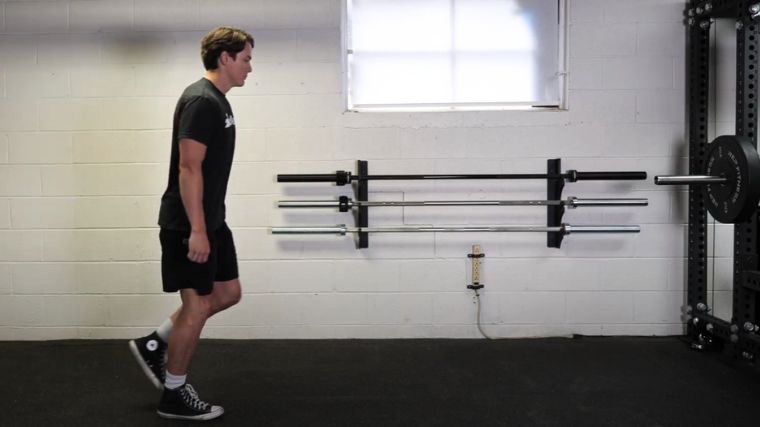
Begin to stand up on the working leg by driving through your full foot. Flex your quads and glutes to push yourself upright. As you begin to stand, draw your trailing leg back to your starting position to complete each repetition.
Coach’s Tip: To keep your repetitions as consistent as possible, treat each repetition like its own set. Return to the starting position between each repetition and fully stabilize before initiating the next step.
Step 4 — Stride
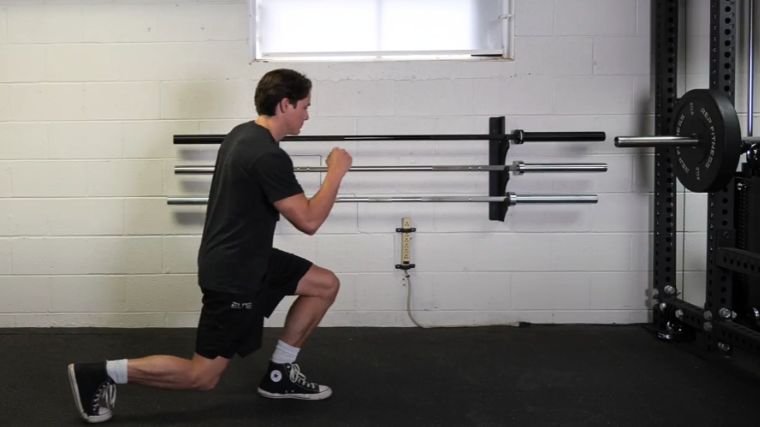
Begin your next rep by initiating with the opposite leg as the first repetition. Perform the exact same technique as before, making sure to maintain your stride length and body tension. Stand up and draw your trailing leg back to the starting position, repeating for repetitions while alternating working legs each stride.
Coach’s Tip: Be sure to maintain full body tension and control over your eccentric portion. Avoid using momentum for your repetitions that might pull you out of a controlled descent.
Walking Lunge Variations
The walking lunge is an amazing training tool in itself, but where you place or hold your weights offers a wide variety of challenges (and benefits). The front rack walking lunge, overhead walking lunge, and offset walking lunge are all unique variations for distinct gains.
Front Rack Walking Lunge
[Read More: The 15 Best Home Gyms]
- Grab a pair of dumbbells, kettlebells, or a barbell and hold them in the front rack position. Stabilize your shoulders, core, and hips.
- Brace your core and begin a controlled first step. Be sure to maintain full foot contact and body tension on each stride.
- Keep your elbows up (maintaining an arm angle parallel to the floor) and control each step. Continue to perform your full set of walking lunges.
Overhead Walking Lunge
[Read More: The Best Posture Correctors]
- Grab a pair of dumbbells or kettlebells and lock them out overhead. Stabilize through your shoulders, core, and hips. Be sure to keep your chest up.
- Brace your core and engage your traps as you begin a controlled first step. Maintain full foot contact and tension throughout your body on each stride.
- With a locked torso and full control of each step, perform your walking lunges as normal.
Offset Walking Lunge
[Read More: The Best Grip Strengtheners for Wrists, Forearms, and More]
- Grab a single kettlebell or dumbbell and hold it in one hand.
- Brace your full body and begin a standard set of walking lunges, resisting the weight pulling you out of position.
- Halfway through your set, switch the weight position so that both sides get equal training.
Walking Lunge Alternatives
Although walking lunges are an extremely beneficial exercise, there are some options available to you as alternatives. Whether you don’t have space to move around or are simply looking for a new twist, the Bulgarian split squat, the reverse lunge, and the Smith machine split squat have you covered.
Bulgarian Split Squat
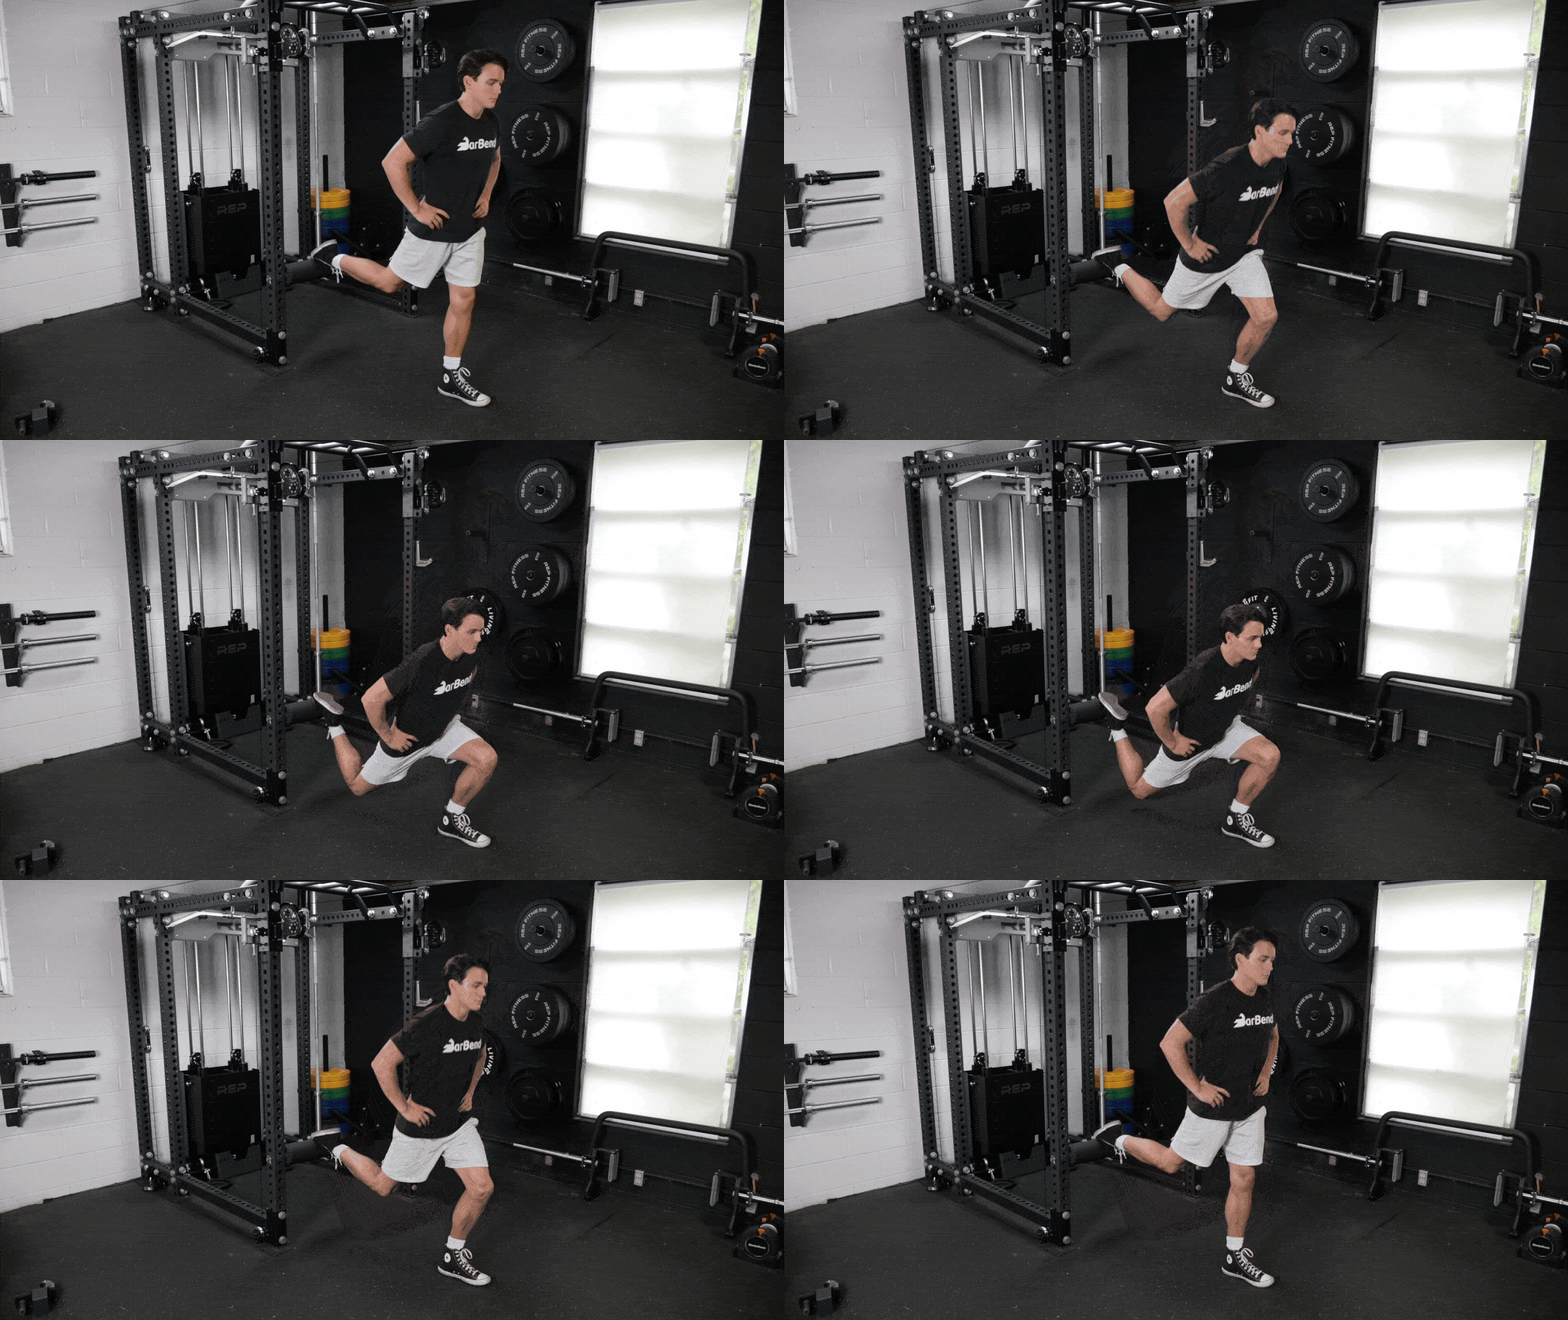
- Grab a pair of dumbbells and a weight bench.
- Hold a dumbbell in each hand, face away from the bench, and place your back leg’s ankle on the edge as a pivot point.
- Maintain full foot contact on the lead working leg. Control your descent into a split squat and perform for repetitions. Match your work on the opposite leg to complete each set.
Reverse Lunge
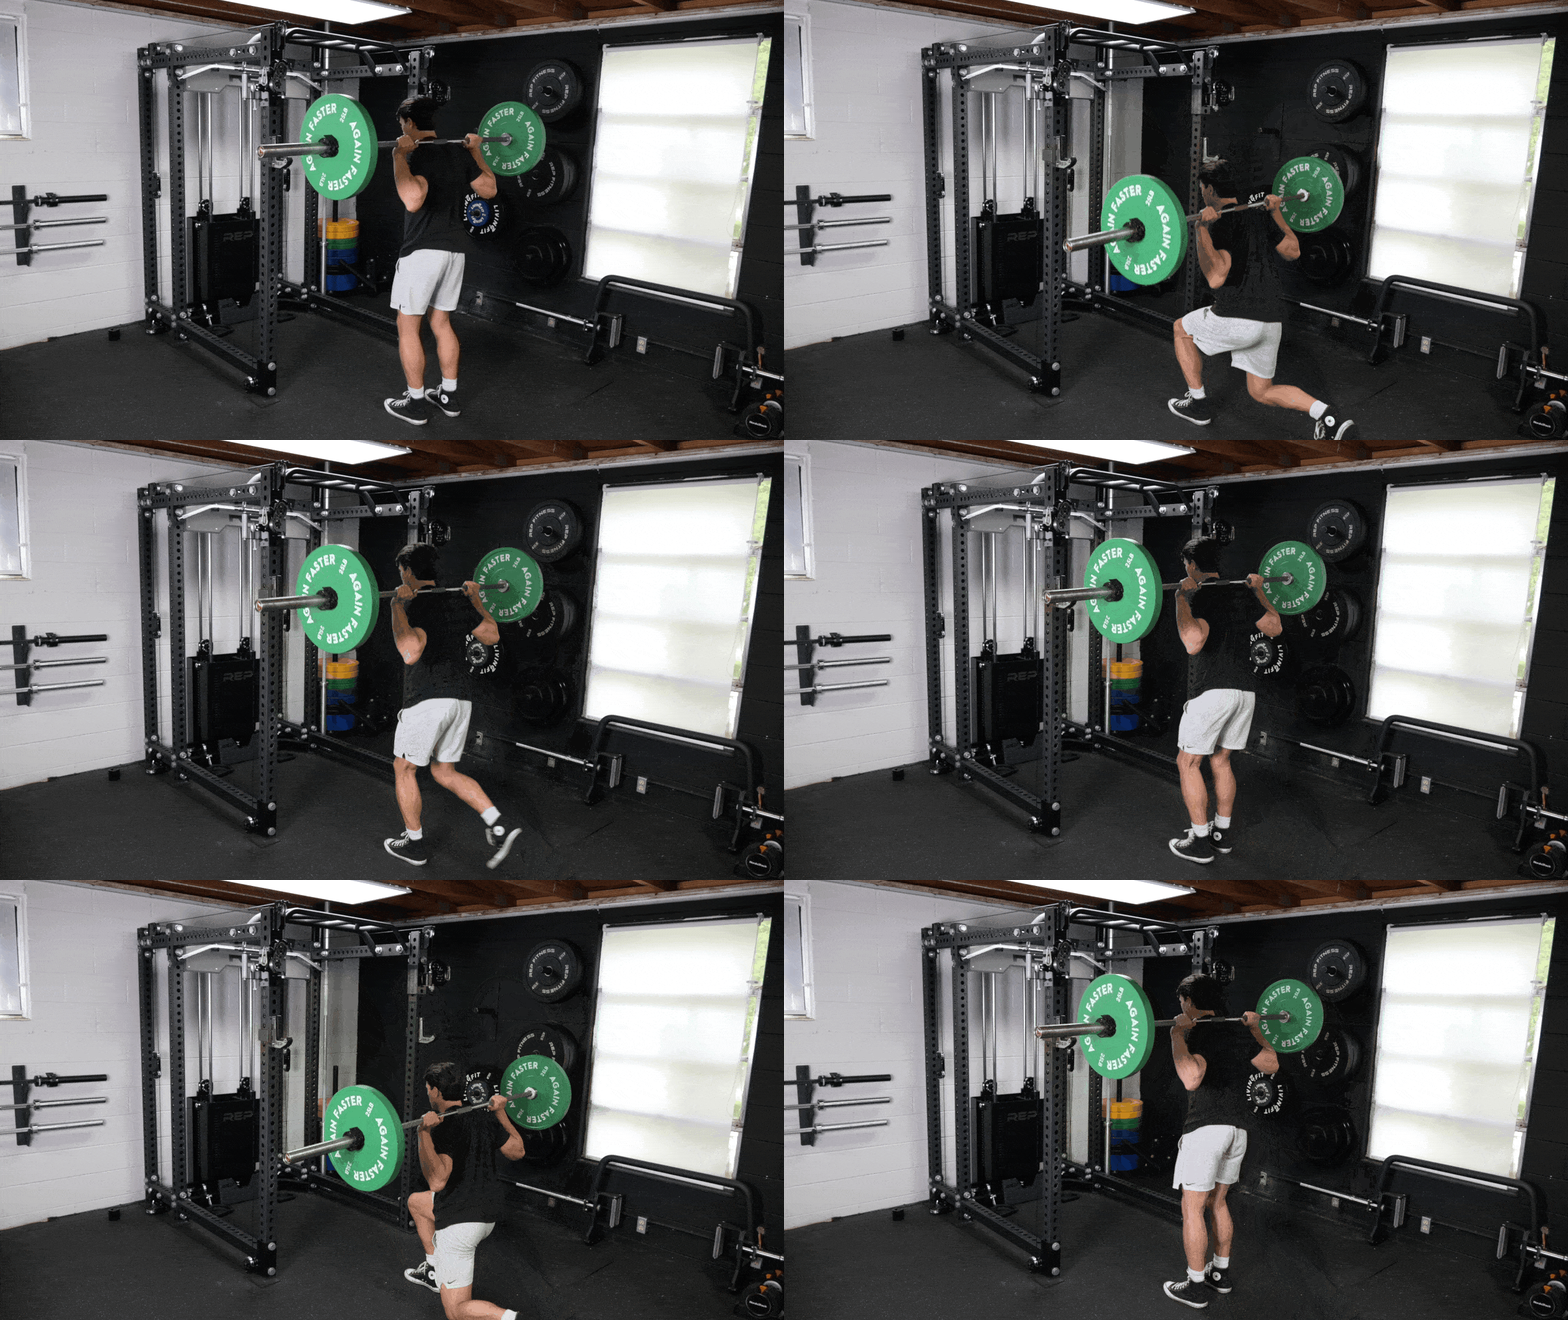
- Perform with body weight alone or grab a dumbbell to hold in each hand. You can also use a single weight for the goblet position.
- Establish full body tension and begin your first repetition with a long stride backward with one leg.
- On your lead working leg, control your descent until your knee reaches approximately 90 degrees. Return to the standing position and alternate for repetitions.
Smith Machine Split Squat
[Read More: The Best Knee Sleeves]
- Place the Smith machine bar comfortably on your upper back and establish full body tension.
- Place your weight on one leg, tensing it to support yourself. Step the non-working leg back into a reverse lunge position.
- Descend on the working leg until you reach approximately 90 degrees at the knee. Drive through your glutes and quads to stand back up, performing for repetitions.
Walking Lunge Tips
To get the absolute most out of your walking lunges, there are a few key points to keep top of mind. Make sure to maintain a strong brace, walk in a straight line, and be mindful of your torso angle.
Brace
Bracing is a key component of nearly every exercise, and the walking lunge is no different. A solid midsection assures that you are in control of each repetition. This is particularly important during the walking lunge, as gravity and momentum are your enemies here.
Brace your core, arms, and back during the entirety of your sets. Tense your legs before you initiate each step, as well. Maintaining your brace keeps tension on the muscles, maximizing your work performed and avoiding any awkward strides or grooving a faulty movement pattern.
Walk in a Straight Line
A common error during the walking lunge is beginning to deviate your stride direction off to one side. This may feel very comfortable, but you’ll get more out of your hips by trying to walk in a straight line.
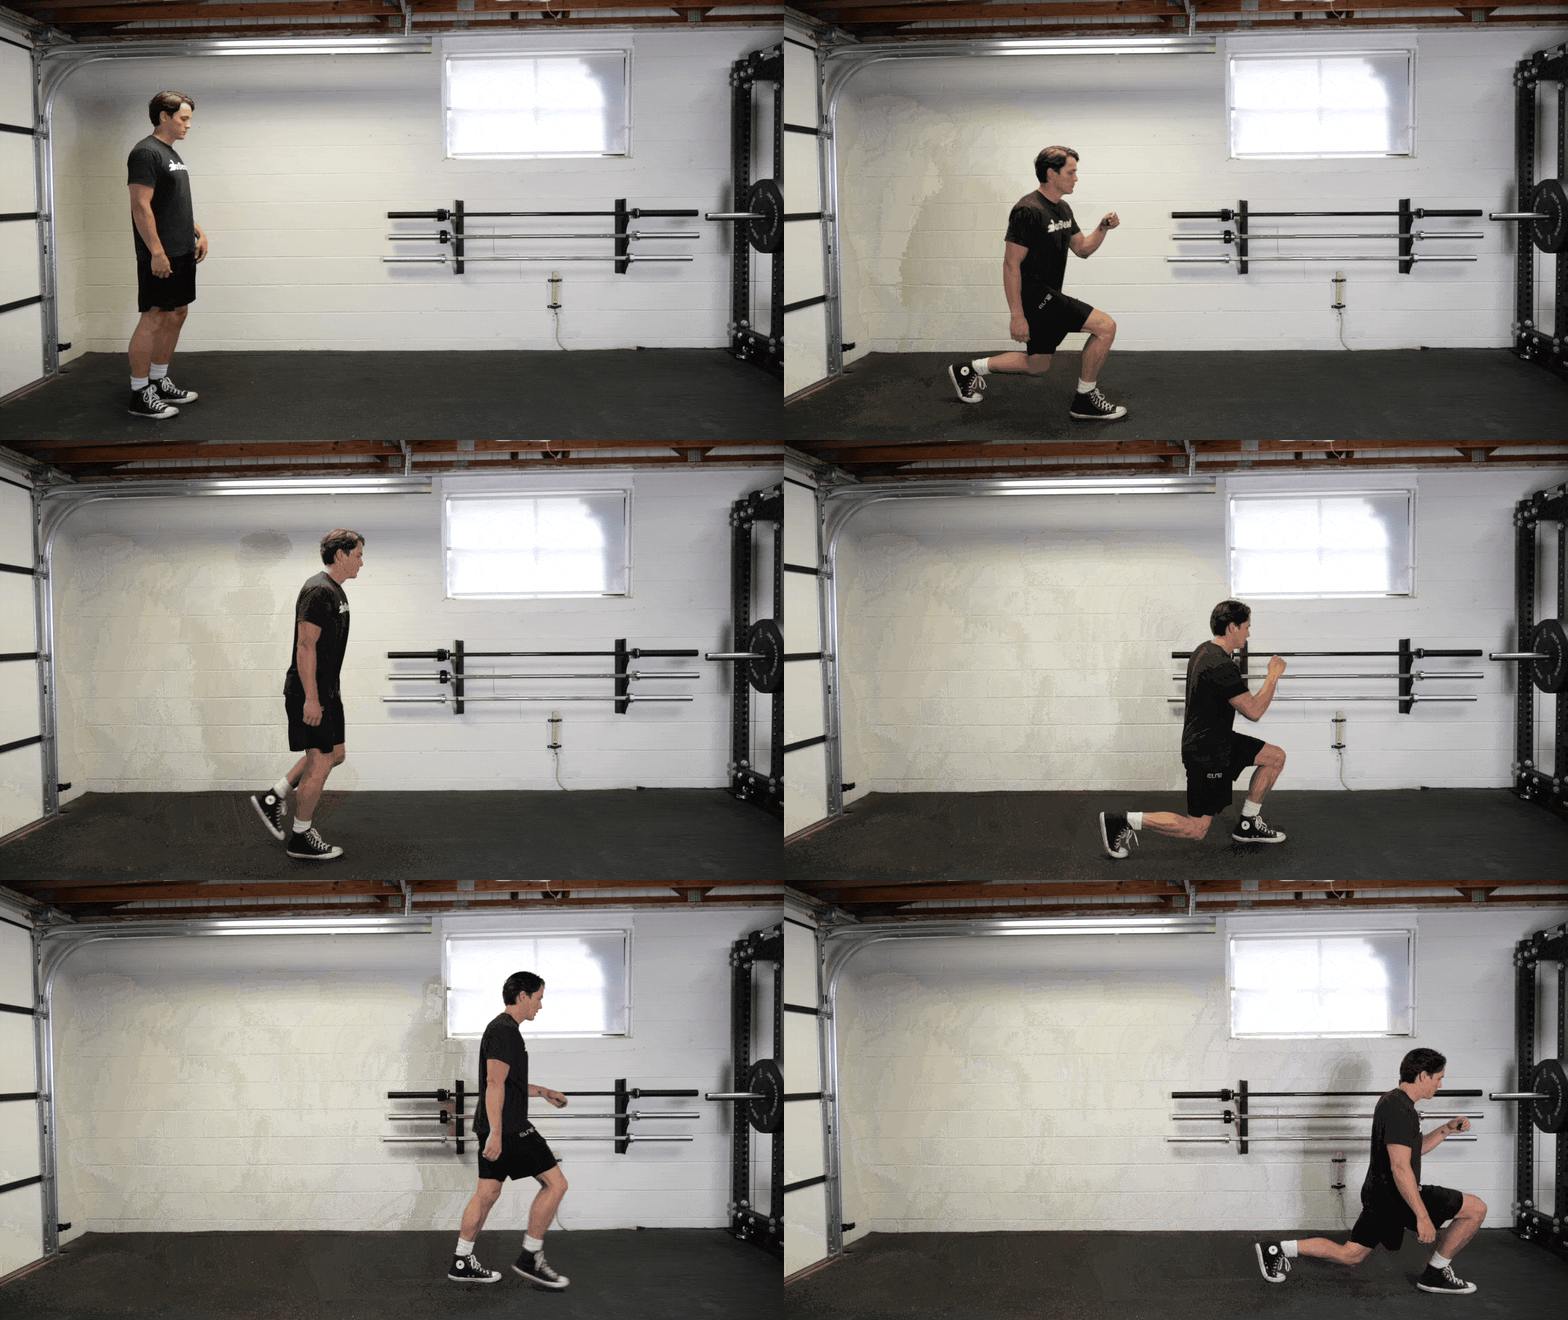
Be mindful of your stride direction and aim for as consistent a walking path as possible while. Search for a good stretch across your glutes toward the bottom of each rep.
Torso Angle
Maintaining a consistent torso angle across your repetitions is another crucial piece of the walking lunge puzzle. As you descend more and more throughout each repetition, you’re going to need to allow for a greater torso lean. This ensures proper muscle engagement at the lower body and core, keeping you working as effectively as possible.
A good rule of thumb here is to allow slightly greater torso lean (while maintaining a core brace and neutral spine) as your strides get longer.
Who Should Do the Walking Lunge
The walking lunge is an exercise that fits many different lifters and fitness goals. Bodybuilders routinely employ the walking lunge for massive gains, but strength athletes and literally anyone else who is able to safely execute the walking lunge should consider cueing them up, as well.
Bodybuilders
Walking lunges target a huge amount of muscle mass for a bodybuilder. The glutes, quads, and even forearms (something needs to hold the weights) are going to get a great stimulus from the walking lunge.
One of the most common practices is the classic walking lunge burnout at the end of a workout. They are particularly useful here as nearly every iteration of the walking lunge allows you to hit muscle failure to really smash the last set of the day and spur some significant hypertrophy.
Strength Athletes
Strength athletes like powerlifters and weightlifters are constantly loaded to the gills with the heaviest weights (often on a barbell) possible. This is a fantastic move to help you increase strength without overloading your spine or the rest of your body.
And if you’re a CrossFitter, lunges — especially overhead lunges — are often a critical part of WODs (that’s workout of the day).

[Read More: Forge an Iron Grip With the 17 Best Forearm Exercises]
The walking lunge performed by a strength athlete reduces the overall load they need to use because it is a unilateral exercise. It also helps train some much sought-after hypertrophy and work capacity to complement their strength programming.
A good deep walking lunge is also a powerful tool for building or maintaining mobility, something that a powerlifter may struggle with. While they may seem like a departure from your everyday barbell workout, the walking lunge is a seriously effective tool for strength training.
Average Gymgoers
Although many of the benefits of the walking lunge seem effective for building muscle and strength, that doesn’t mean they are only for competitive athletes.
The walking lunge takes something you may well do each day — walking — and intensifies it in a customized way. You can start with a relatively small range of motion and build deeper and deeper stretches from there. Similarly, you can start with an unweighted, bodyweight-only version and add load gradually.
[Read More: The Best Pre-Workouts, RDN Approved (Personally Tested)]
No matter your experience level, if you’re able to master the mechanics of a lunge, this move is a solid option for mobility, strength, muscle-building, and coordination. You really can’t go wrong.
Walking Lunge Sets and Reps
Your choice of sets and rep schemes has a big impact on the gains you see. Lower repetitions with higher load help drive maximal strength, whereas a more moderate set and repetition count with medium loading is often used for muscle growth.
While it’s possible to pursue many goals across multiple goals, being a bit more specific for your needs can get you there faster.
- For Muscle Mass: Perform three to four sets of 10 to 12 repetitions. Rest for 90 seconds to two minutes between each set.
- For Strength: Perform two to three sets of eight to 10 repetitions. Rest for two to three minutes between each set.
- For Endurance: Perform three to four sets of 12 to 15 repetitions. Rest for 45 seconds between each set.
Note: While strength training typically calls for even lower repetitions, the dynamic challenge and unilateral training you’ll perform during the walking lunges will moderate your load. This means that you’ll be safer performing slightly higher reps with a slightly lower load and using the perfect technique.
Benefits of the Walking Lunge
The walking lunge has something for nearly everyone. It is a staple of leg day for a reason, whether you’re aiming to build muscle, mobility, or coordination. Performed for high enough repetitions with appropriate rest periods, you’ll even challenge your cardiovascular system.
Muscle Gain
One of the clearest benefits of the walking lunge is the potential for building muscle when you push your sets toward failure. There’s nothing quite like the deep stretch and ever-building burn that a long set of walking lunges delivers. Both of these help bring your quads and glutes closer to muscle failure and deliver a strong stimulus for growth.
With a lower barrier to entry — requiring minimal equipment and load — the walking lunge is one of your highest-ticket bodyweight exercises for muscle gain.
Hip Mobility and Stability
Mobility and stability provide a double dose of benefits with the walking lunge. Since the walking lunge is a unilateral move (performed on one leg at a time), and is dynamic, you’ll be getting both more mobile and more stable and coordinated within the same set.

[Read More: The Best Online Workout Programs For Coaching, Cardio, Value, And More]
The forward motion of each step constantly challenges your ability to stay braced and not wobble around on your feet. The depth of each step also places a nice dynamic stretch across your hips and eccentrically loads your entire lower body.
Cardiovascular Gains
An unplanned but welcome benefit (depending on who you ask) is the absolutely devastating end-of-set cardio challenge that walking lunges deliver. Since they are unilateral, constantly moving, and loadable, the walking lunge packs quite the punch for your cardio training.
Performing a moderate to high repetition set while clamping down on a pair of dumbbells easily taxes your lungs as much as anything else. Expect to be sucking wind for a few minutes between each set, but your cardio fitness will thank you down the line.
Muscles Worked by the Walking Lunge
Between force production on each repetition and the core bracing you’ll need to stay stable, nearly your full body takes on the walking lunge. The major players are your glutes, quadriceps, forearms, and core.
Glutes
Your glutes are responsible for hip extension. This is taking your hip from flexed to straightened or from the deepest part of your lunge back to standing. While there are other muscles at play here, your gluteus maximus is one of the most powerful in your entire body.
[Read More: How to Do Hip Thrusts for Strong and Powerful Glutes]
The other responsibility of your glutes during the walking lunge is stability. Your gluteus medius is a huge contributor to hip stability, particularly while on one leg. Between producing force on each rep and maintaining a stable stride, your glutes are going to get a ton of stimulation.
Quadriceps
The quadriceps are a partner in crime for your glutes during the walking lunge. The quadriceps are a hip flexor and knee extensor. This means that they help to control your descent on the eccentric portion of each repetition, but also help produce force on the concentric. Think of your quadriceps as the break during the lower phase but the gas during the lifting phase.
Forearms
Your forearms are a big part of almost every weighted walking lunge variation because of the need to hold onto weight. Regardless of your starting point, the goal is overload. At some stage of your training, you’ll likely need to grab a pair of dumbbells or kettlebells to increase the challenge of your walking lunge.
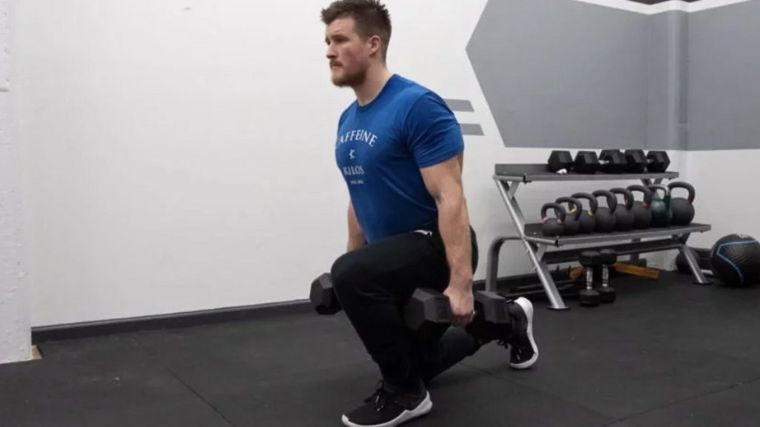
When this happens, your grip is immediately introduced into the equation and your forearms get a nice taste of endurance and strength training along the way.
Core
Any free weight exercise calls upon your core in some capacity. Once you escape a machine that holds you in a very specific range of motion, your core has to take on that responsibility. Due to the dynamic motions that walking with weights (especially during a unilateral exercise), your core is called upon to maintain your stability.
Common Walking Lunge Mistakes
There are some common mistakes to avoid if you’re looking to maximize your results from the walking lunge. The first is to avoid using momentum, but also to ensure proper foot pressure on each repetition. You also want to select the right load for the job to produce progressive overload without overwhelming your technique.
Momentum
Momentum is the enemy of the walking lunge. It’s easy to get carried away with an arm swing or to lose control over the descent of each repetition. This is to your detriment, however.
Staying in complete control makes sure that muscle keeps doing the work instead of relying on momentum. Stay tight, move slowly, and make each move deliberate to keep marching toward progress.
Foot Pressure
Foot pressure is a common error during the waking lunge. In every exercise, complete foot contact with the ground is essential to avoid losing balance. This is especially important during the walking lunge since you are moving throughout the entire set.
[Read More: The 20 Best Leg Exercises for Muscle and Strength]
Make sure you land flush on your full foot, without wobbles side to side or being too toe or heel-heavy. Full foot contact keeps you the safest but also most effectively able to train your lower body muscle mass.
Overloading
Progressive overload is an essential part of all training. It is the act of adding challenges to match your growing muscle, strength, or any number of adaptations. The goal is to adequately intensify the stimulation you get per workout despite you improving each time.
Overloading your walking lunge without building up to it appropriately can have a negative impact on your gains. Using too much weight increases the likelihood that your technique will break down before your legs get the challenge you want.

[Read More: The 17 Best Lower Body Exercises to Level-Up Your Leg Day]
Use every tool at your disposal, from shortened rest periods and increased repetition counts, before adding weight. When you’re ready to add weight, add on gradually to make sure that your form remains pristine.
Stride Toward Gains
Walking lunges are an excellent step in the right direction for pretty much any goal you have in the gym. You’ll get strength, muscle, mobility, and stability all at once. Even cardiovascular training is wrapped up neatly in the walking lunge.
With minimal equipment and set-up, massive progression potential, and simple execution, it’s hard to argue against the walking lunge. Train your quads, glutes, core, and forearms with this one compact exercise. Embrace the challenge of a walking lunge and tack some additional gains to your next leg workout.
FAQs
With all the benefits of the walking lunge, there are some frequently asked questions. Here’s the need-to-know.
There is some inherent risk involved in any exercise or program. However, when you perform them correctly and with an appropriate load, the walking lunge is no more risky than any other exercise. Be diligent about technique and take your time on progressions. As with any exercise, if you have concerns, check in with a doctor or physical therapist.
The walking lunge is a great tool to add as one of your last exercises in a lower body session. Since it is so taxing across many muscles (and even your cardio) it makes a great workout finisher on leg day. You can also use a low amount of reps to help warm up before training or integrate them into your program as muscle-building accessory exercises.
The walking lunge benefits from progressive overload. As you hit a plateau, a good rule of thumb is to increase repetitions, add a set, apply tempo (move slower), or reduce rest times. Reserve adding weight as the last step you take toward progression to ensure that your form stays picture perfect when you are ready to go heavier.
Featured Image: PeopleImages.com – Yuri A / Shutterstock